Cosmetic facial surgery has never been more popular, and contemporary surgeons realize the importance of volumizing the face and providing enhancement and symmetry.
Facial implants remain one of the most popular volume options for numerous reasons. Contemporary facial implants are anatomic, designed to fit precisely over the bone, come in many sizes and shapes, and provide 3D volume. Their placement is simple; when fixated (or integrated), they are permanent. And one of the biggest pluses is that they can be easily removed, if desired.

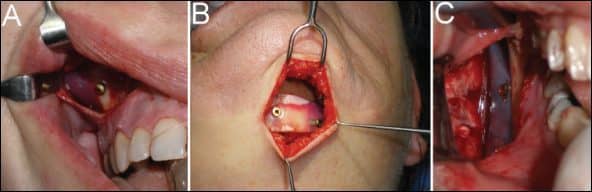
Figure 1. Titanium screws are used to secure all implants. For example, a cheek implant with a single screw (A), a chin implant with two screws with one for antirotation (B), and a mandibular angle implant secured with a single screw (C).
Cheek, chin, and mandibular angle implants are the most common in many practices, although many surgeons use nasal, tear trough, lip, and other specialized implants.
As with any procedure, complications can occur with facial implants. Generally, complications can be grouped into those associated with the placement technique and those associated with healing or lack thereof.
Figure 2. This patient has combined submalar implants that are not placed symmetrically. This patient’s paucity of subcutaneous fat also makes the implant margins more apparent than the average patient.
The remainder of this article will deal with common complications associated with cheek, chin, and mandibular angle implants, and their prevention and treatment.
PREOPERATIVE CONSIDERATIONS CONTRIBUTING TO IMPLANT PROBLEMS
Complication prevention begins with the patient consultation. With all the advantages the Internet has brought, it also serves to promote misinformation. Potential implant patients may think they will receive benefits that are not consistent with the implant procedure.
For instance, it is not uncommon that I see a cheek implant consult who wants cheek implants to lift the jowls. It is imperative that the patient understands exactly what implants will and will not do.
Germane to this is the younger patient who specifically requests to have Brad Pitt’s chin or Leonardo Di Caprio’s jaw. The Internet has definitely contributed to a subclass of very young patients who become fixated on sculpting or cloning, and feel that implants will be the answer. It is not uncommon for me to receive e-mailed pictures of patients desiring implants, and they simply don’t need them. As to the celebrity cloning, while some surgeons may thrive on this, I try to avoid it at all costs. First of all, in many cases it is difficult to accurately give someone the features of someone else. Also, this class of patient is often very narcissistic and expects perfection. They are frequently very tied into Internet cosmetic and plastic surgery bulletin boards, and if they are not happy with the results they will go out of their way to punish the surgeon in the online arena.
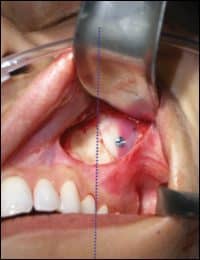
Figure 3. Aligning the medial edge of the implant with the maxillary teeth can facilitate estimating the symmetric placement of cheek implants. An imaginary line is used to standardize both sides (assuming normal occlusion).
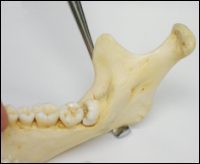
Figure 4. A “J” stripper is used to dissect the mandiblar sling (the attachments of the masseter and lateral pterygoid muscles) in order to obtain sufficient space to accommodate the inferior portion of the implant at the inferior border of the angle region.
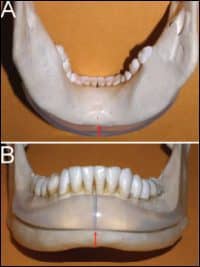
Figure 5. Correct implant placement is paramount for success. (A) shows an implant extending too far below the mandibular border; (B) shows an implant placed too superiorly which does not overly the dense cortical bone of the mandibular symphysis.

Figure 6. Chin implant complications: An implant that is displaced in the horizontal plane (A) and one that is displaced in the vertical plane (B). Visualize the final position of the implant before closing. Placing a midline screw and an additional antirotation screw can prevent horizontal or rotational displacement.
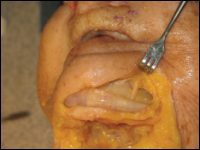
Figure 7. This cadaver dissection shows the close relationship between some chin implants and the mental neurovascular bundle. The implant should not come in contact with the nerve or else pain and nerve damage can occur. If the implant tail has the tendency to ride up toward the nerve, a lateral antirotation screw can be placed to anchor the tail inferior to the nerve.
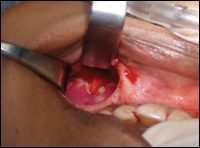
Figure 8. A maxillary submalar cheek implant is relieved with a notch to keep the implant from impinging on the nerve.
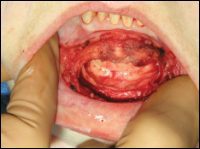
Figure 9. This patient is shown after removal of a highly mobile “button” chin implant that had been placed years previously. There is severe resorption that extends through the entire mandibular symphysis.
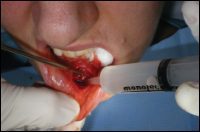
Figure 10. This patient developed an abscess after implant placement 6 days previously. Incision and drainage, systemic antibiotics, and daily antibiotic irrigation were successful in eliminating the infection and saving the implant. Had this implant not been screw retained, it would have been removed in the face of purulent infection.
Every surgeon with a little gray hair knows that picking the “right” patient has a lot to do with getting good results.
MAKING GOOD IMPLANT CHOICES
Another common area of postimplant complications comes from a misdiagnosis of sorts; that is, choosing the incorrect implant for the given aesthetic situation. This is common when a patient is in need of submalar augmentation but ends up with high lateral malar augmentation. The physician simply got the incorrect size or shaped implant for what was needed.
I separate the cheek complex into three zones: submalar, malar, and a combination of those two, which is panmalar. Specific silicone implants address specific areas or combined areas, and knowing what implant will best serve the patient is important. Sometimes, a resident will ask me how I know what implant to use. This is a hard question to answer, as much of it is based on experience. For novice implant surgeons, I suggest they have a seasoned implant surgeon review pictures before the surgery to confirm the implant sizes and choices.
Whereas the previous paragraphs relate more to cheek implants, the same can be said about chin and mandibular angle implants. I prefer more tapered chin implants for females. However, for males I may opt for a “glove”-type configuration to provide more bulk and lateral fill.
I avoid “prejowl” implants—although they may fill in the prejowl sulcus, if the patient has a facelift then that added lateral augmentation may not be in their favor.
In terms of mandibular angle implants, the diagnosis can be difficult. I feel this is one of the hardest regions in which to achieve dramatic results. There are several reasons for this. Some patients already have sculpted and angular posterior mandibular anatomy, so adding an implant can be very dramatic. Other patients, though, have a very rounded mandibular angle with almost no antegonial notch and very thin ramus and masseter thickness. Coupled with thick skin with generous subcutaneous fat, you are faced with a situation that is much more difficult to improve.
You take this big, beautiful, sculpted mandibular angle implant and place it under thick tissue, and all the definition is lost. I explain to patients it is like placing a grapefruit under the sheet on your bed. You can definitely see the outline, but if you place the grapefruit under a thick down comforter, you can hardly see the outline. For these reasons, I always underpromise with mandibular angle implants.
MIGRATION
Implant migration is a common problem that can be totally avoided. I am a staunch advocate of rigid implant fixation. I place a single screw in all cheek, chin, and mandibular angle implants (and sometimes two in the chin) (Figure 1). Some surgeons feel this is unnecessary, but I see numerous patients from other offices who present for reoperation with displaced implants.
Some surgeons use suture fixation to secure their chin implants. While I think it is better than nothing, it is not rigid and allows the implant excessive mobility in the healing phase when compared to a screw. Although the body is pretty forgiving, mobile implants are frequent contributors to inflammatory bone resorption and infection. In reality, once the fibrous capsule develops the implant is probably stable, but years of micromovement can lead to problems. I only use screws.
Mandibular angle implants are a bit more difficult to secure with a screw due to their position. A right-angled drill and screwdriver greatly facilitate the problem. Some surgeons choose transcutaneous screw fixation through the cheek, which is a viable approach but requires experience and instrumentation. I simply use a 5- to 6-inch drill shaft to drill the hole in the anterior ramus at the coronoid notch region. The length of the drill shaft allows the negotiation of anatomy in that region.
SYMMETRY
Implant placement is both an art and a science. The science involves the implant material and anatomic shape, as well as the surgeon’s mastery of anesthesia and anatomy. The art lies in the surgeon’s ability to place an implant (or pair of implants) in the right place on each side and achieve a symmetric result.
Cheek implants present the biggest problem. Think of it as trying to hang two pictures of the same size on a wall but without a level or ruler. You have to “eye it” and usually get it close enough to pass, but sometimes the difference is considerable and has to be corrected.
Symmetric placement of cheek implants is an educated guess. You are placing implants into a cavity that is only partially visible and against bone that has very little identifiable anatomy to match side to side. To standardize the position of cheek implants, I rely on several constants. Number one is the infraorbital foramen—this is useful to figure out the superior/inferior position. I always visualize the neurovascular bundle during placement, just to make sure that the implant border is not in direct contact with the nerve.
Most of my cheek implants are several millimeters inferior to the infraorbital foramen, with the exception of the high lateral malar implants. I try to gauge their position by the inferior and lateral orbital rim.
In terms of medial/lateral placement, I generally use the maxillary teeth as a gauge to standardize the implant position. The most common implant I place is the silicone submalar type. Most often, the medial border of the implant is aligned with an imaginary line in the cuspid or first premolar region (Figure 2). I will also sometimes use the pupils as standardization markers and draw marker lines on the cheek, although this is less accurate when the patient is supine and sedated.
Figure 3 shows an asymmetric placement of the right cheek implant. Although not a problem of symmetry, patients with low body fat may present with a situation where the periphery of the actual implant is visible through the skin, much like breast implants.
Mandibular angle implants are easier to standardize, as there is not much space for them to move. I prefer the Taylor extended mandibular angle implant, as it has a ledge that fits under the mandibular border that assists in proper positioning.
When placing mandibular angle implants, I always use a “J” stripper elevator to disrupt the mandibular sling. Without detaching this muscular sling, it may be difficult to place the inferior border of the implant in alignment with the inferior border of the mandible (Figure 4).
The most common positional problem with mandibular angle implants is biplanar rotation. The masticatory muscles are very active and can quickly displace a nonsecured implant. It is imperative to have the implant overlay the lateral mandibular ramus in a passive state or the clinical result will be affected.
To ensure that the silicone implant does not extend below the mandibular border, I will take a 1.5-inch needle and place it through the cheek to “sound” the silicone and bone. The silicone should not be palpable with the needle below the inferior border of the angle region (although some implants are designed to specifically extend below the mandibular border).
CHINNY CHIN CHIN
Chin implant malposition is also common and can be affected in all spatial planes. A very common problem is an incongruous midline discrepancy. This can be deceiving, as patients have a true mandibular midline that may or may not align the upper and/or lower dental midline of the soft-tissue midlines.
Proper preop chin implant planning requires verifying the chin midline by dropping a vertical vector over the preoperative frontal picture. This can assist in determining the validity of the chin to the face and elucidate discrepancies or asymmetries. It is imperative to find the true mandibular midline when placing chin implants.
The next most common problem with chin implant placement is malposition in the vertical and/or horizontal plane. In most cases, the bottom of the implant should be flush with the inferior border of the mandible. Placing it too superiorly can produce an unnatural result. In addition, the thin bone over the incisor roots is prone to resorption—the implant should be placed over the menton, where the cortical bone is denser. Placing the implant too inferior (sometimes in an attempt to increase the vertical length of the chin) can produce a bothersome palpable step between the bottom of the implant and the inferior border of the symphysis.
Pitch and yaw—or vertical and horizontal displacement—are also problematic (Figures 5 and 6). A “kicked up” implant can have a very unnatural result; a “kicked down” implant can cause the implant tails to press against the mental nerve. A lighted Aufricht nasal retractor provides excellent visualization of the relevant anatomy of the chin and the implant. I use this to complete my positional final inspection before closing.
NERVE PROBLEMS
One hundred percent of implant patients will experience some level of paresthesia. This can be from disrupted mucosal innervation, peripheral nerves, or major dermatomal sensory nerves. The simple act of incising tissue and dissecting and retraction around the main neurovascular bundles can cause some component of neuropraxia. Permanent nerve injuries are rare without damage to the sensory nerves as they exit the foramen.
Explantation of nonsilicone facial implants that have integrated into the surrounding tissues can be very difficult to remove, and in some cases it can contribute to nerve injuries. Any implant, regardless of material, can produce nerve injuries if a portion of the implant is in direct contact with a main branch of the sensory nerve. Micromovement during animation or muscle function, or finger pressure on the face that produces shooting and radiating pain, can be indicative of the implant pushing on the nerve (Figure 7).
It is important to inform patients that they will all have some initial component of paresthesia after cheek or chin implant placement, but it should resolve over a matter of weeks or sometimes months.
The same can be said about cheek implants and their relationship to the infraorbital neurovascular bundle. If the implant is in close proximity to the nerve, a notch is made to keep the implant from contacting the nerve (Figure 8).
DYSFUNCTIONAL ANIMATION
In the case of cheek implants, the incision and dissection will transect or detach some of the lip elevator musculature. This is less of a problem in the case of chin implants when placed transcutaneously; however, the mentalis muscles are frequently transected with the intraoral approach.
Patients must be informed that their animation, especially smiling and puckering, will be temporarily affected when placing cheek or chin implants. It is not that animation is lost. It is just reduced and generally recovers spontaneously over the next several weeks.
BONE RESORPTION
When I was a resident, I was told that implants don’t work because they cause bone resorption. After placing many hundreds of facial implants over a 20-year period, I disagree.
One has to consider that a sliding genioplasty or any bony manipulation of the chin will induce bone remodeling and a certain amount of resorption. I have seen severe pathologic bone resorption from chin implants done elsewhere, but in every case there was no significant fixation.
A mobile implant is merely a foreign body, and the body will react appropriately. I have seen cases in which a chin implant has resorbed from the anterior mandible, through the entire symphysis and almost into the sublingual space (Figure 9). The old-style “button” silicone chin implants, placed over tooth roots and not fixated, are common offenders of pathologic resorption.
Again, I believe in using screw fixation with all implants to avoid pathologic mobility. In servicing implants that I placed years prior, I have observed osseous “settling” of the implant but never severe pathologic resorption. I have treated numerous cases from other offices for bony resorption in the symphysis by removing the offending implant, bone grafting the defect, and later replacing a suitable implant.
INFECTION
Infection with facial implants is rare, but it can occur. In my experience, I do not think that the decision to place implants from an intraoral versus extraoral approach makes a difference. If I am performing platysmaplasty or submentoplasty, then I will place chin implants from the skin incision. However, if I am not already incising the submental skin, I favor the intraoral approach. I do believe that nonfixated implants are more prone to infection, as the movement can encourage inflammation and bone resorption.
Steps to discourage infection include sterility of the implant, keeping glove powder and debris off of the implants, intraoperative antibiotic irrigation, and systemic antibiotics. Also, when placing retention screws in the maxilla for cheek implants, I try to keep the screws on the dense lateral zygomatic buttress bone and not the thin bone of the canine fossa, as with all maxillary sinus communication.
If a non-screw-retained implant becomes infected, it should be removed and salvage should not be attempted due to it being a foreign body. In cases where implants are fixated, incision, drainage, and systemic antibiotics can manage many infections, and antibiotic irrigation can be performed numerous times per day (Figure 10).
Most infections occur early in the postoperative course, and late implant infections have been rare in my experience. My experience has also shown that smokers or patients with poor oral hygiene are more prone to infections. Using a postop oral antibiotic rinse, such as Peridex, is never a bad idea with implant patients regardless of hygiene.
Joseph Niamtu III, DMD, is a board-certified oral and maxillofacial surgeon whose private practice in Richmond, Va, is limited to facial cosmetic surgery. He can be reached at .

